Monday, January 11, 2010
Yikes!! Oh and Beef Stew too...

Wednesday, October 21, 2009
Steak Wrap
Yesterday was the first day I got to properly cook in my new home kitchen...and what did I decide to make? A simple but oh so yummy steak wrap! I've been on a bit of a meat binge lately...last week at work my project was to create 3 burgers from around the world...Greek, Mexican, and Korean. If you've been reading my blog you know that I am a burger-aholic...now to be paid to develop burgers and taste them...why it's as if this job was tailor made just for me...you can imagine the sheer excitement! I would love to share the recipes with you now but I think it's best if you check them out on my company's site once we post them up. I'll be sure to include the link here!
Which brings me to dinner last night...I wasn't thinking of meat...but then at the grocery store I came across a package of minute steaks for only RM6....and it's not everyday that you find meat that cheap!! So I picked it up and decided right away that dinner was going to be a simple yet satisfying wrap.
It was delicious...the meat had a good bite to it without being chewy...and the flavours of the creamy avocado, fragrant cilantro, peppery rocket, tangy tomatoes, zingy onions, and spicy mustard worked together beautifully!
Steak Wrap
(As for the amounts this is totally up to you...this is a rough guide of the ingredients but you can put more or less of each thing according to your taste preference)- Strips of Minute Steak
- Diced Avocado
- Diced Tomatoes
- Diced Onions
- Chopped Cilantro
- Rocket Leaves
- Spicy Dijon Mustard
- Tortilla Wraps
- Salt and Pepper to taste
Grill the steaks on high for a minute on each side just to get a nice coloring and sear the surface. Season with salt and pepper and set aside covered in foil to rest. After a few minutes slice the steak into little pieces. Combine the avocado, tomatoes, onion, and cilantro in a bowl and add salt and pepper.
To assemble spread some dijon mustard on the tortilla wrap, top with rocket leaves, meat slices, and the veggie mixture. Fold and seal shut on a hot skillet or on a sandwich toaster. Enjoy!
Friday, October 09, 2009
An Update
This is a very simple olive and onion pizza...I decided to make this because I wanted to try out a recipe for a thin crust pizza base that doesn't need to proof...this is a dough that you can just mix and roll out right away and pop in the oven...this is done faster than the time it takes for you to pick up the phone and call Domino's pizza...and homemade is always much better!All you need is 2cups of flour, 3/4 cup water, 2tsp yeast, 1tsp sugar, a pinch of salt and 2tbs olive oil...mix it all up...knead and roll out as thin as you can get it...add toppings of your choice...pop in the oven at 180C and cook till the crust browns slightly. This recipe makes 2 pizzas.
With this recipe I don't think I'll ever call for a pizza again!
We've also had a lot of filo pastry lying round the office which we've been meaning to use up...so I stewed some fresh nectarine slices in a grapefruit cranberry juice with some sugar...and then I put this together baklava style...a few slices of pastry brushed with butter...then I layered on the nectarines...and then layered on more slices of pastry followed with a ricotta, nutella, nut mixture...this was interesting and tasted like a fruit pie...
I also made spinach, ricotta, walnut rolls...those were delicious!!This is what I've been busy doing in the kitchen at work over the past few days...next week I'm cooking up a series of burgers from around the world...and also some ghoulish halloween treats!
Tuesday, August 04, 2009
Cake au Thon (Tuna Cake)
Say what?!?! Yes...your eyes aren’t deceiving you...tuna cake...this is a regular in French kitchens and yet I had heard of its existence just a few weeks ago. It wasn’t part of my mom’s daily repertoire as we were growing up…and well honestly my mom didn’t cook French food very often…aside from boeuf bourguignon (burgundy beef), coq au vin (chicken in wine stew), and hachis parmentier (sort of Sheppard’s pie)…we were more likely to see chicken curry and dhal or simple western dishes such as spaghetti bolognaise on the table. I guess for one thing my mom was cooking dishes that my dad would enjoy and identify with…and she was making dishes that were fast and easy as being a mother of two doesn’t always allow the time to prepare gourmet meals.So just recently my mom got hold of a recipe for cake au thon…tuna cake…and so she decided to make it…she loved it so much that gave me the recipe…and at first the name just didn’t sit right with me…tuna cake…sure there aren’t any sweet ingredients…so it’s not that kind of a cake…but still…just the words tuna and cake together seemed strange…but at my mom’s insistence about how good it is I decided to bake it…and you know what? This is really really good! It’s tasty…and filling…you can have a few slices with a salad and you’re set to go. Sometimes you just have to try things…at least once to know if it’s something you’d like.
Tuna Cake
You can choose to change up the filling for this. My mom likes to use pine nuts and green olives. Next time I make this I'm thinking about adding in sundried tomatoes as well. It's so simple to make and it makes a great meal.
3 eggs
100ml milk
80ml olive oil
100g flour
1/2 tsp baking powder
1 tsp salt
Handful of chopped basil
Handful of sliced black olives
1/2 handful of capers
1 1/2 cans of tuna, drained (I use 1 can of chilli tuna and half a can of tuna in water)
1 handful grated gruyere cheese (I didn't have gruyere and used emmenthal)
Preheat oven to 200C. Mix the eggs, milk, oil, flour, baking powder and salt. Add in the basil, olives, capers, and tuna. Pour into a loaf pan and sprinkle on top with the cheese. Bake 40-45 mins.
Friday, July 24, 2009
Nilam's Green Pasta
Yesterday I was at the grocery store trying to figure out what I wanted to make for dinner...I had nothing set in mind and I was walking around aimlessly for a while when I remembered a pasta that my good friend Nilam had mentioned she had made earlier in the week...it was a simple olio with garlic, spinach, and avocado.I knew I wanted something with those flavours and so decided to make a pasta dish inspired by what she had created. This is what I came up with...a spinach walnut pesto with avocado on green tea pasta...a very green and healthy pasta and I named it Nilam's Green Pasta for two reasons...the first because she is the most environmentally friendly person I know...she recycles, composts, brings her own canvas bag when she goes shopping, and is now thinking of becoming a vegetarian...when I think of going green I immediately think of her...and she has taught me a lot about changing small daily habits to make a difference...the second reason this pasta fits her so well is the fact that she loves to eat healthy food and is particularly fond of spinach...she calls herself the spinach girl...so this concoction was perfect for her!
Nilam's Green Pasta
Spinach Walnut Pesto:
3 cups fresh spinach leaves
1/4 cup extra virgin olive oil
1/2 cup toasted walnuts
1/2 cup freshly grated Parmesan
3 cloves roasted garlic
2 tablespoon fresh lemon juice
2 tsp lemon zest
Salt and Pepper to taste
Add all ingredients to a food processor and pulse until it is has a smooth creamy consistency.
1 avocado cubed
1 tablespoon lemon juice
Green tea pasta
1 tsp salt
Toss the avocado cubes with the lemon juice to keep it from oxidising and turning brown. Bring a pot of salted water to a boil. Cook pasta as per package instructions. Once the pasta is done toss it with the spinach walnut pesto and top with the avocado cubes. Enjoy!
This was very tasty the only mistake I made was to overcook the pasta slightly and so it was a bit starchy and clumpy...but the flavours worked very well together! I brought this pasta over to Nilam's place last night and we had a lovely dinner! Oh and the photo does not do it justice...sometimes a dish can taste great but is just not photogenic at all!
Tuesday, July 21, 2009
Dubrovnik
It’s been 1 year since Dubrovnik, a quaint little Croatian restaurant, opened their doors here at Solaris and I was fortunate enough to get a sneak peek of their Croatian month celebration. I spent an afternoon there enjoying a cooking demonstration by their head chef and owner Zoran Djumic...along with some food tasting and a sampling of strong grappa coffee!Croatian food is influenced by many other European countries...a bit of Italy...the Mediterranean...and more...the flavours are mild and fresh but very cheese rich as well...I wonder how the Croatian women stay so slim!
Chef Zoran places an emphasis on healthy food using organic vegetables and fresh seafood. In his cooking there is a lot of attention paid to detail and preparation. He chose to show us how to cook two authentic dishes...the Riba Grah (pan fried catch of the day) as well as the Istrian Canneloni. Here are his recipes to try out at home:
Riba Grah
200gms Barramundi Fillet2 tablespoons ground Sesame
3 sprigs Spring Onion
3 Red Chillies deseeded
1 cup Fish Stock
1 tablespoon chopped Parsley
100gms Butter Beans
Salt and Pepper to taste
Coat the fish with sesame and then pan fry for 2mins on both sides. Finish off in the oven for 5mins. Quick fry spring onions in hot oil and add the chillies. Sautee briefly. Cook the butter beans in the fish styock, drain and add the beans to the spring onion and chilli. Salt and pepper to taste. Place the fish on top of the beans and enjoy!
I enjoyed the light flavours of this dish and the butter beans were wonderful! So creamy and buttery with a nice fish stock flavour...slurrrp!
Istrian Canneloni
20 Crepes500gms Cottage Cheese
150gms Ham
200gms Mushrooms
200gms Bread Crumbs
500gms Fresh Tomatoes
5eggs Beaten
Salt and Pepper to taste
Cut the ham into small cubes. Sieve fresh cottage cheese through a strainer. Fry the ham in light oil, add mushrooms, salt and pepper. Once cooked through mix these ingredients with the cottage cheese and fill the crepes with this mixture and roll. dip the crepes in the egg mixture and then coat with bread crumbs and fry till golden.

Oh so cheesey and gooey and yummy! Crepes with a cheesy filling can never fail!
Tuesday, June 16, 2009
Asian Noodle Soup
Even though I'm half Asian and I've spent most of my life living in Asia I rarely cook Asian meals...sure my Western dishes might have a little bit of Asian flair as far as spices or seasonings go...but I just don't cook Asian food...I suppose it's because I can just walk down the street and find all sorts of stalls with anything I could want...Chinese dishes, Indian curries and rotis, Malay rice dishes...and it's cheap...dirt cheap.So buying all the ingredients and cooking it myself is actually more expensive than just stepping out my front door. The only reason anyone living here would want to cook it themselves is if they want to be healthy...because although the stalls have very tasty food it is usually cooked with the lowest quality of ingredients and usually very high in fat.
Last night I decided to make my first Noodle soup dish...just the way I like it with green leafy veggies, large juicy oyster mushrooms, little pieces of tofu and an egg cracked into the soup and muddled in...it turned out very well! Extremely delicious and full of good proteins and hardly any fat. I think I'll be making more of my own Asian dishes from now on!
Spicy Noodle SoupChicken broth (This depends on how many you are cooking for and how soupy you like it)
5 Ginger slices
3 Garlic cloves, smashed
2 tbs Light Soy Sauce
2 tbs Chilli Sesame Oil
Handful of green leafy veg (I used choy sam, you can use spinach or anything you enjoy)
Handful of oyster mushrooms
Handful of diced firm tofu
Handful of noodle of your choice (I used soba)
1 Egg
Bring the chicken broth to a boil with the ginger and the garlic. Turn it down to simmer for 15mins. Bring it back up to a boil and toss in the noodles. Once they start to soften add in the tofu and mushrooms. Break the egg into the pot and whisk it around to make the broth murky. Turn off the heat and add in the leafy veg and once it starts to wilt add in the soy sauce and chilli sesame oil. Voila! A simple nutritious and tasty meal.
Thursday, May 28, 2009
It's all in the Meat!
For mother's day I cooked dinner for the family...it was my gift for my mom. The menu consisted of a green salad with a honey ginger soy dressing, tenderloin steaks with pepper sauce and a side of garlic sauteed asparagus, and for dessert, a honey and yogurt fruit and nut salad. A well balanced healthy and nutritious meal!Wednesday, March 11, 2009
Mediterranean Quinoa Salad
Quinoa is an ingredient that most people are not familiar with, but this protein packed powerhouse is perfect for a light yet filling carb free meal. Quinoa contains a balanced set of essential amino acids making it a complete protein source. It is also gluten free, easy to digest, a good source of dietary fibre, and is high in magnesium and iron.I decided to toss the Quinoa with dried fruit and nuts to give it a Mediterranean flair that is exotic and delicious. This can be eaten as a main dish or you could omit the chicken and have it as a side. It's delicious either way!
Mediterranean Quinoa Salad
Handful of grilled chicken
1/2 cup chopped dried cranberries
1/2 cup chopped dried figs
1/4 cup toasted almond slivers
Rind from 1 lemon
Lemon juice from half a lemon
1 tbs olive oil
Salt and pepper to taste
1/2 cup cooked Quinoa (as per package instructions)
Once the Quinoa has cooled down, toss in the cranberries, figs, almond slivers, chicken and lemon rind. Squeeze lemon juice on top and drizzle in the olive oil and mix well. Add some salt and pepper. This can be made the night before and kept in the fridge.
Monday, February 02, 2009
Tuna Casserole
Over the CNY break my fridge wasn't stocked and many of the stores in the neighborhood were closed for the holiday...so for lunch one day I decided to see what I could find in the kitchen...I ended up having all the ingredients for a tuna casserole minus the grated mozzarella cheese and bread crumbs to sprinkle on top...I improvised and just cut up a few slices of creamy Camembert to throw into the mix...so this ended up being a decadent creamy cheese pasta.Tuesday, January 06, 2009
A New Look for the New Year!
And speaking of healthy cooking...I decided to start the blog this year with a piece I did on fish as I've found it can be be a tricky ingredient to work with and many choose not to...I hope this will change that as I absolutely love cooking with fish!
Fish is an ingredient that can be difficult to prepare and even more difficult to select if you’re not used to doing so, but getting it just right can be so rewarding. It is so versatile that it can be cooked in many different ways; fried, baked, grilled, poached, raw sashimi style and a Chinese favourite, steamed. This is why I sat down with Lai Chong Seng the Chinese Banquet Chef at the Hotel Maya to find out a thing or two on getting a typical Cantonese style steamed fish just right.
To start off you need a nice fresh piece of fish. The freshness of the fish plays a huge role in the turnout of the overall dish. Fresh fish shouldn't have a strong fishy smell or taste. Chef Lai points out that the first thing you need to look out for is the colour of the fish. If you’re looking at a whole fish then the tell tale sign is all in the eyes. Eyes that are bright and clear indicate freshness, but if the eyes are cloudy or sunken in, stay clear. With fillets, you need to look at the colour of the meat. If it is translucent and shiny then it’s fresh and if it’s dull or creamy then it’s not. Another way to detect freshness is in the feel of the flesh; a firm bounce to the touch is what is ideal.
Once you have selected your piece of fish all you need to do is steam the fish with a little bit of ginger. The ginger gets rid of any fishy aroma and makes it fragrant. Ideally fish should be steamed for 8 – 10 minutes but a simple way to check if your fish is done is by poking it with a skewer or a chopstick. If it is soft and the stick goes in easily then the fish is done to perfection. It if is undercooked pressure would be needed to poke the skewer through and if it’s overdone then the fish would be dry and rubbery.
Chef Lai then shared with me his signature recipe for steamed fish. “I love fish and I love the flavour of mustard leaves and so one day I thought that it might taste good together…so I tried it and it worked!” he exclaims. One piece of advice he gives with this recipe is to simmer the dried mustard vegetable on a very low heat for a long time rather than on a high heat as this will dry it up too fast and the flavour will not be as intense. If Garoupa is not available, Chef Lai also suggests substituting it with other firm fleshed fish such as Cod or White Pomfret.
Steamed Star Garoupa Fillet with Dried Mustard
200gm Star Garoupa Fillet
50gm Sweet Dry Mustard Vegetable
5gm Sliced Black Mushrooms
2gm Shredded Ginger
1tsp Oyster Sauce
1/2tsp Sugar
1/2tsp Dark Soy Sauce
Cut dried mustard to small pieces; poach it on a very low flame until it softens. Leave it to drain. Heat 1 teaspoon of oil in a wok and add in the dried mustard vegetable, mushroom and ginger. Stir fry until fragrant then add in some water, oyster sauce, sugar and dark soy sauce and cook for 15 minutes.
Steam the Star Garoupa fillet for 8-10minutes. Once done pour the mustard vegetable on the fillet, garnish and enjoy!
Tuesday, December 09, 2008
Pasta-rrific!
You can never go wrong with pasta; it’s comfort in a bowl paired with any sauce, meat, or seasoning imaginable. It is a dish that can be prepared in many different ways with creamy sauces or with just a drizzle of good olive oil and a sprinkle of fresh herbs.I sat down with Chef Derrar, the Executive Chef of Ristorante L’Opera at the Piccolo Hotel, to learn what a great traditional Italian pasta dish involves. He believes in simple yet tasty preparations, letting the ingredients speak for themselves. His philosophy is to preserve colour, aroma and to be true to the purity of the product; to have a timeless blend of flavours, boundless creativity, a penchant for crossing geographical boundaries, and a strong belief in taste as the ultimate appraisal of the dish.
He tells me that the difference between an average pasta dish and a great one is in the noodle itself. Homemade may take a little extra time and effort but it is the only way to go...and the satisfaction upon completing this step successfully is unmatched.
Chef Derrar decides to make me a Milanese with Saffron Pappardelle and dashes off to the kitchen to get started. He returns with a plate of steaming pasta – wide flat noodles taking on the orange tinge of the Saffron topped with chicken, charbroiled red peppers, and peas...simple and delightful. I take a bite and a smile spreads across my face and only then Chef Derrar pulls out a chair and sits down to share his secret to making pasta:
The best flour to use is the Doppio Zero Flour (300g) as it is super fine and mixes smoothly without lumps. This combined with two large eggs and a pinch of salt is all it takes.
Pour the flour and salt on a wooden workspace and make a well in the middle. Break the eggs in the middle and fold the flour inwards till it forms a dough like consistency. If the dough gets too sticky add a little bit of warm water. Knead and work the dough for a good 20minutes to get a firm but pliable consistency. Wrap the dough in cling film and let it rest in the fridge for two hours. This makes 500g of fresh pasta.
Once out of the fridge roll the dough out on a lightly floured surface to desired thickness. Chef Derrar says that if you don’t have a proper rolling pin then a wine bottle is the next best thing. For the Pappardelle you would want to roll it 2mm thick and slice it into 1cm wide strips.
To cook the pasta, bring cold water to a boil with salt. The moment the pasta starts to float is when it is al dente and you can drain it. And now it’s ready to be tossed with any sauce.
Milanese with Saffron Pappardelle
Ingredients:
1 small onion diced
1 clove garlic sliced thinly
100g diced oven baked chicken breast
1 handful char grilled red capsicum
1 handful fresh peas pre-sautéed in butter
100ml chicken stock
1g fresh saffron
50ml olive oil
50g unsalted butter
Salt and pepper to season
Preparation for the oven baked chicken:
Season a chicken breast with salt and pepper and bake it in the oven at 190celcius for 15minutes. Once cooked let it cool and dice it for the Milanese sauce.
Preparation for the capsicum:
With a pair of tongs old the capsicum over the flame on a gas stove. Do this until the skin turns black then wrap it in aluminium foil for a few minutes so that the flesh separates from the skin. Take the capsicum out of the foil and put in a bowl of cold water to make peeling the skin off easier. Slice the capsicum into thin strips.
Milanese Sauce:
In a heavy saucepan heat the olive oil on medium heat and add the onions and garlic and sauté till they are browned. Add the chicken breast, red pepper, and fresh peas and toss. Add in the butter and heat through and then add in the chicken stock to deglaze the pan. Let this simmer for a few minutes then season with salt and pepper. This sauce is now ready to toss with the pasta for a delightful meal.
Tuesday, November 25, 2008
Idiot's Guide #1: Chorizo Sausage Lentil and Bean Stew

Wednesday, November 12, 2008
An Idiots Guide to Cooking
Tuesday, January 29, 2008
Poached Fish and Zucchini Croquettes
This was my first time poaching fish and I found the recipe very easy to follow. The broth was light and fragrant, perfect for the simmering fish fillets. Once it came time to make the sauce I was quite surprised that no flour was used to thicken it. But upon tasting it I could understand why...this is not supposed to be a thick creamy sauce but rather a light healthy one. The addition of hot sauce(I used Tabasco Garlic) made all the flavors come together harmoniously.
There were quite a few steps involved in making the zucchini croquettes and one problem I had was figuring out how much water to squeeze from the grated zucchini strips...the more I squeezed the more water came out...it seemed neverending! Eventually I settled on semi-dry strips and decided that the breadcrumbs added at a later stage would take care of the moisture. Once everything was mixed together I moulded the patties and fried away...the minute these hit the hot oil you can smell the aromatic mingling of herbs, cheese, and zucchini...it made my tummy grumble!All in all these two dishes were a success...in the future I will try using different types of fish to see how that changes the flavors.
Here are the recipes for you to follow:
Poached Cod in Lemon Fumé Broth
1 cod fillet
1 cup vegetable or mushroom broth
1 cup dry white wine
1/2 lemon
2 cloves minced garlic
1 T dried dill weed
1 T dried onion (or 2-4 scallions, minced, or 1/4 C leek leaves, minced)
3-4 sprigs cilantro, chopped
2 T butter
salt, hot sauce to taste
-Cut the fish into serving pieces (1 per diner).
-Combine the broth, wine, garlic, dill weed, onion, and cilantro in a skillet (sufficient to eventually accommodate comfortably all the fish in one layer) over medium heat. Squeeze the lemon into the pan and then cut it into several slices and place in the pan. Simmer the mixture for about 20 minutes. Add the fish and modulate the heat so the broth barely bubbles. Poach the fish for a total of about 4 minutes per inch of thickness, turning carefully when half cooked. (Reduce the time proportionately for the thinner pieces from the tail of the fish. If the thinner pieces are completely submerged there is no need to turn them.)
-Remove the fish to a warmed plate. Cover with foil and set aside while you finish the sauce.
-Strain the solids from the broth in the pan and return the liquid to the pan. Raise the heat to high and reduce quickly by half. Stir in the butter and season carefully with salt and hot sauce.
To serve, place the pieces of fish on a warm flat serving dish and spoon the sauce over them.
Zucchini Croquettes
4 courgettes
1 onion
Mint leaves
Basil leaves
Salt and pepper
4 egg yolks
Bread crumbs
100 g of grated parmesan
-Grate the courgettes very finely and salt them. Let them rest for 10 minutes, then drain and squeeze them to throw all the excess water.
-Add the onion, grated, them mix together with the egg yolks, the minced herbs, 100 g of parmesan and some bread crumbs, until perfectly combined.
-Heat good quality frying oil, and add spoonful of the courgettes mixture, frying until golden.
-Sprinkle with salt and serve right away.
Tuesday, January 22, 2008
Amah's Recipes
Photo from left to right: Sambal Udang Petai(Prawn Chili Paste w/ Petai), Spicy Spinach, and Egg CurrySambal Udang Petai
- 1kg Prawns (cleaned, shelled and deveined)
- 10 Garlic Cloves roughly chopped
- 15 Shallots roughly chopped
- 2 handfuls of Dried Chili
- 1 handful of Shredded Coconut to make santan
- 1/2 cup of Oil
- thumb of Tamarind paste
- thumb of Belacan
- handful of Petai
- Boil the dried chili in water for 10 minutes. Rinse it with cold water and get rid of the seeds. This will ensure that the sambal is not too spicy. Blend the chili in a blender to make it into a paste. Keep aside.
-Add the thumbful of Tamarind paste in a little bowl with 1 cup of water to soak. Keep aside.
-In the blender add the shredded coconut with 2 cups of water. Blend then strain the liquid. Keep the liquid aside this is known as santan.
-In a large wok heat the oil. Saute the shallots, garlic and belacan till fragrant and brown. Add the blended chili paste and keep stirring. Wait till the oil rises and add a splash of the tamarind water. Stir then add a splash of santan. Let it simmer for a while and stir occasionally. Add the rest of the tamarind water and another splash of santan. Keep stirring and let the sauce thicken. Once the sauce is thick you can add the prawns just for a few minutes till they are cooked through. Take out the prawns once they are cooked so you don't overcook them. You can now choose to add the petai and cook for another 10minutes adding more santan to taste. Once the sambal is done you can add the prawns in again.
Friday, November 23, 2007
Airplane Food? I Don't Think So!! **Repeat post from last year**
Or is it?
Last night Avril and George(My parent's friends parents{tongue twister I know!}) were leaving on a flight to go back home to Spain. They were in KL visiting their son and our family had the pleasure of meeting them. Knowing that they were doomed to a fate of airplane food we decided to have them over for dinner before their flight. We were going for a light, simple, flavorful meal. And I think my mom and I accomplished just that!
As an appetizer with drinks I whipped up hummus and baba ganoush with small pita triangles. I wish I had a photo for you but before I could even take one the guests were digging in (I guess that's a compliment!)
Next we served up in buffet style in no particular order:
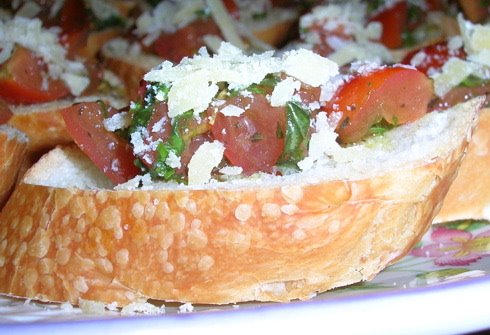
Bruschetta
I got this recipe from my sister's(Steph) boyfriend Ralph. He makes the most amazing Bruschetta. It is so fresh and delicious. The secret to this dish is in the olive oil and balsamic vinegar, the better the quality the yummier it is!

2 cups chopped cherry tomatoes
4 tablespoons balsamic vinegar
5 tablespoons olive oil
Fresh grated Parmesan to top it off
Baguette or Italian bread sliced
This is the basic bruschetta mix and then you can add spices of your choice to give it that extra oomph! I added Thyme, Oregano, Fresh Basil, and Fresh Parsley. Chop up the tomatoes, add the balsamic vinegar and olive oil along with all the spices and let it marinate for at least an hour or up to 2days. Broil the bread, rub it with garlic, and brush it with olive oil. Top it off with the tomato mixture and cheese.
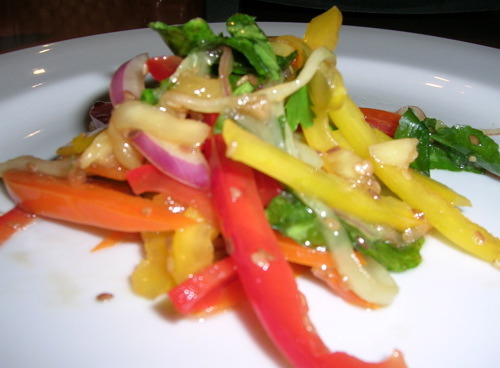
Honey Ginger Bell Pepper Salad
This is a salad my mom and I made drawing inspiration from many different recipes. The flavors all worked very well together and we had a guest wiping the salad bowl clean with bread!

3 bell peppers in any color
1/2 unripe mango
1 cucumber remove the seeds
1/4 red onion
1 handful of fresh mint
1 handful of fresh coriander
1 handful of watercress
Thinly slice the bell peppers, mango, cucumber, and red onion. Toss in mint, coriander and watercress. Mix in dressing.
Dressing:
1 tbs honey
1 tbs soy sauce
1 tbs sesame oil
1/4 cup balsamic vinegar
1/4 cup olive oil
2 tbs grated ginger
1 handful of sesame seeds
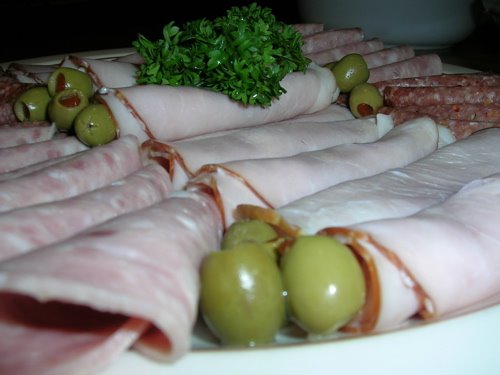
We also served cold cuts but no I didn't make them...sadly I have not yet reached that level of chefdom.

Spicy Salmon Pasta
We decided to make a fusion pasta...Italy meets Malaysia. It was spicy and exciting, everything a pasta dish should be! While the picture may not look too pretty (hey I said I could cook not take photos!) it was definitely a very yummy dish!

Unfortunately since we made this for 10 people I don't really know what to tell you in terms of proportions..in fact we didn't measure anything we just made what we figured would be enough for 10...so I'll tell you what goes into it instead and you can decide how much of each thing you want in it. After all it is all a matter of each person's individual tastes.
Smoked salmon cut in pieces
Chopped dried chili pepper
Chopped fresh basil
Chopped chives
Sliced garlic
Pine nuts
Heat up olive oil. Add garlic and stir till light golden brown. Add all the other ingredients just to heat up for a minute and then add in pasta of choice. We went with spaghetti.
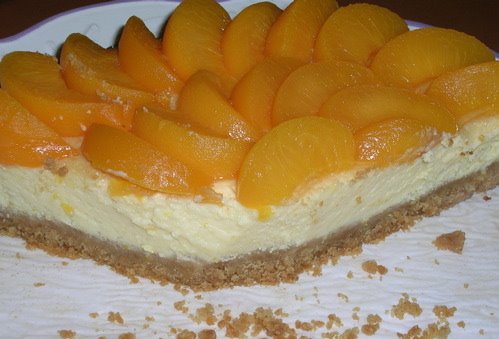
Cheesecake Topped With Peaches

For dessert Chandri(A family friend) brought a gorgeous cheesecake! As you can see from the photo the guests cut it up and ran off with their slices before I could even take a photo of the whole cake. It was light and delicate, the perfect end to a meal!
All in all the night was a success!
And hopefully we sent Avril and George off to a flight filled with less of Mr.RectangularContainerJammedWithInedibleGunk and more drowsy food induced sleep.
Thursday, November 01, 2007
Good Ol' Fish N Chips
A succulent tender fish dipped in beer batter and then deep fried till it's crisp....fries made from scratch by cutting potatoes with the skin still on and deep fried... While it's obviously not the healthiest choice, who doesn't like something that is deep fried till it is crunchy and full of flavor?To me fries are the ultimate comfort food...just the right amount of salt, crispiness, and flavor to satisfy me at meals and even just to snack on whenever hunger strikes! What better to pair homemade fries with than a battered fried fish! So I looked in the fridge and saw that I had a can of beer too...beer batter is very light and airy. It makes the batter fluffy and crispy once fried.
The end result: The meal was delicious! It didn't feel too greasy or heavy but rather the opposite. The subtle flavor of the fish with a little bit of lemon squeezed on it was heavenly. Paired with fries made from scratch it was the perfect sunday afternoon meal!
Beer Battered Fish
1 tsp salt
1 tsp black pepper
4 white fish fillets (I used grouper)
225g of flour
1 can of cold beer
3 tsp baking powder
Whisk the flour, baking powder and beer together till it has mixed properly. Season the fish with salt and pepper on both sides, then lightly dust it with some extra flour to help it dry out a bit. Heat the oil till it is very hot. Test it by dripping a teaspoon of batter into the oil. If it sizzles and immediately begins to brown then you know it's ready. Dip the fish in the batter and carefully put it in the pan. Don't crowd your pan with too many fish. Cook it until it is a nice golden brown. Once you have taken all the fish out place it in the oven to keep warm as you fry the french fries. Drain the fish on paper towels once out of the oven. Sprinkle them with salt.
Homemade Fries
Potatoes sliced into chips
Parboil the potatoes for 5mins just till they turn slightly soft. Add the fries into the pan with the oil that was used to fry the fish and fry till they are golden. Now to make your fries extra crispy you are going to want to double fry it. So once you have taken the fries out of the pan and drained them, toss them back into the hot oil just for a few seconds to crisp up even more. Drain the fries on a paper towel. Season with paprika or another seasoning of your choice!
Serve the fish and chips with lemon wedges and malt vinegar for those who like their fries with salt and vinegar. Enjoy!